Mobile and Tablet Devices Review

Cyber Living posts the specifications or details of the latest mobile phones and tablets with some thought comments on the device You can find them by clicking the MOBILE?TSBLET DEV on the menu bar above. Or you can click this link Mobile and Tablet Devices

Computer Problems Solutions

For personal computer/notebook problems and tips, refer to PC PROB from the menu or click this link Personal Computer Problem Solutions.

What's in the world with Philippine ISPs

Discussions about Philippine Internet Service Providers (ISPs) particularly problems users are encountering but are not getting any solutions.

  • Tips or work around to these problems to improve browsing experience.
  • Do you have any problems too? Give your comments below each of the posts to be heard.
  • Or better yet, send me a message on our contact form if you want a dedicated article to your problem on this site.
  • Bloggers and Webmasters tips/tricks

    Looking for something to implement to your site? Our Bloggers' tips/tricks have what you need. If you do not find it there, notify us through our contact form.

    SEO Tips

    Tips to improve your rankings on Search Engine Resuts Pages (SERPs).

    Tuesday, July 30, 2013

    Nokia Asha 501 Review/Spec

    Nokia Asha 501 front
    Nokia Asha 501 Dual Sim |
    image source: http://www.nokia.com.ph

    Nokia Asha 501 (Dual SIM)

    Here is an inexpensive Nokia phone that would be new phone owner want to buy. At first glance this phone may look like a Lumia only smaller.

    Apparently the Asha 501 tries to go against the current norm and went smaller instead of bigger. The Asha 501 is small at 99.2x58mm (h x w) compared to what we are normally sold in the market these days. There was a time back in the early days of cellular phones where smaller is better, this phone is trying to prove that. Of course the only disadvantage is that with a smaller body, you will also get a smaller display which is not so good when you are browsing or playing games or videos.

    Here are some positive notes about this phone
    Nokia Asha 501 swap SIM
    Easily swap SIM withou loosing each SIM's settings |
    image source: http://www.nokia.com.ph

    • Low data usage full browsing experience - It also tries to minimize data usage while browsing with its Nokia Express Browser. It uses less data while still richly displaying content.
    • Get Social all-in-one screen - With a single swipe, it brings out your social media interface in a single screen. Updating status and receiving them are all in a single screen.
    • Swapping SIM has never been easier - Now it is possible to swap SIM cards and never have to worry about the settings in each SIM. It remembers settings of up to 5 SIMs.


    User experience:

    Here are some comments from people who have already used the device.


    • Pros:


      1. Good battery life
      2. phone is good for its price
      3. gives smartphone experience for a phone that is not
    • Cons

      1. small browsing screen
      2. no support for apps like nimbuzz and whatsapp.


    PricePhp3,000 - Php4,500
    NameNokia Asha 501
    Release DateJune 2013 (Announced May 2013)
    Operating SystemNokia Asha software platform 1.0
    Dimensions99.2 x 58 x 12.1 mm (3.91 x 2.28 x 0.48 in)
    Weight98.2 g (3.46 oz)
    Network TypeGSM 900 / 1800 - RM-899; 850 / 1900 - RM-900; GSM 900 / 1800 - SIM 1 & SIM 2 - RM-902
    SIMOptional Dual SIM (Micro-SIM, dual stand-by)
    Display TypeTFT capacitive touchscreen, 256K colors
    Display Size240 x 320 pixels, 3.0 inches (~133 ppi pixel density)
    Multitouch Display?Yes, Up to 2 fingers
    Vibration AlertYes
    MP3 Alert/RingtonesYes
    LoudspeakerYes
    Speaker JackYes, 3.5mm jack
    Internal Memory128 MB, 64 MB RAM
    Memory ExpansionYes, microSD, up to 32 GB, 4 GB card included
    GPRSYes, Up to 85.6 kbps
    EdgeYes, Up to 236.8 kbps
    WLANYes, Wi-Fi 802.11 b/g
    BluetoothYes, v3.0 with EDR
    USBYes, microUSB v2.0
    Primary Camera3.15 MP, 2048x1536 pixels
    Secondary Camera-
    Video CaptureYes,QVGA@15fps
    AccelerometerYes
    Proximity SensorYes
    Other Sensors-
    MessagingSMS(threaded view), MMS, Email, IM
    BrowserWAP 2.0/xHTML, HTML
    RadioYes, FM only
    GPSNo
    JavaYes, MIDP 2.1
    ColorBright Red, Bright Green, Cyan, Yellow, White and Black
    BatteryLi-Ion 1200 mAh battery (BL-4U)
    Battery | Stand-byUp to 1152 h (dual SIM: Up to 624 h)
    Battery | Talk Time Up to 17 h (dual SIM: Up to 17 h)
    Battery | Music Play TimeUp to 56 h
    Battery | Browsing Time-
    SAR US1.41 W/kg (head)
    SAR EU0.96 W/kg (head)
    Support Pagehttp://www.nokia.com/ph-en/support/


    Back to CyberLiving home page

    Other Posts
    Back to home page

    Samsung Galaxy Tab™ 2 7.0 Review/Specs


    Samsung Galaxy Tab 2 7.0 front view
    Samsung Galaxy TM Tab2 7.0 front view |
    source: http://samsung.com

    Samsung Galaxy Tab™ 2 7.0 (Wi-Fi) 8GB


    Last April 22, 2012, Samsung has released another tablet from their 7-inch series. The Samsung Galaxy TabTM 2 7.0 seems a rehash of the earlier released Galaxy Tab 7.0 Plus.

    To be honest, because many loved the Galaxy Tab 7.0 Plus but had reservations in buying due to its price, they have this released.

    Looking from a distance the it looked like the Tab 7.0 Plus. Only at closer inspection will you see the difference in thickness (Galaxy Tab2 7.0 is slightly thicker). There are also several other downgrades here and there like its front camera which is VGA resolution from an HD quality in 7.0 Plus. CPU speed is now 1Ghz from 1.2Ghz in 7.0 Plus.

    Still, many of the selling point of the Galaxy Tab 7.0 Plus is carried to it like its bright TFT LCD display, microSD slot and rear camera. 

    Here are some positive notes about this Tablet

    • Loaded with lots of apps and can carry lots of content - Although not necessarily a plus, it comes pre-loaded with apps from social media to weather updates, access to Google Play Store, entertainment and many more. Of course a user can always remove apps he/she deems not necessary. And with an external microSD port (up to 32G) of files and media storage couple that with a cloud storage of 50G (good for 2 years free), an owner could carry virtually everything he/she needs.
    Samsung Galaxy Tab2 7.0 endless apps and content
    Endless apps and content at your fingertips | source: http://samsung.com

    • Easily customized - With Touchwiz, things is easily customized and organized giving easy access to contents.
    Samsung Galaxy Tab2 7.0 TouchWiz
    Add a touch of TouchWiz and contents are accessed easily | source: http://samsung.com
    • A home entertainment Tab - Stream shows from TV screens using SmartView. If you lost your TV remote, this Tab can do it for you.

    • Extendable Memory - With the built in microSD slot, memory can be extended and give up to 32G more memory of storage for files like photo, documents, video and music.
    Samsung Galaxy Tab2 7.0 microSD slot
    Load up more data with up to 32G more memory | source: http://samsung.com

    User experience:
    Here are some comments from people who have already used the device. Most feedback are positive.

    • Pros
    1. Bright display.
    2. Built-in speakers.
    3. Leight weight.
    4. Inexpensive.
    5. Realistic color.
    6. Solid feel
    7. With flash player

    • Cons

    1. Can't install apps on the microSD.
    2. Most apps from Google Play are supported but there are still some that it does not support.

    Here is the complete list of its specifications:

    PricePhp11,000 - Php12,800 (as of July 31, 2013)
    Operating SystemAndroid 4.1, Jelly Bean
    Processor / ChipsetTI OMAP4430
    -
    Graphic'none'
    Display7"; 1024x600Pixel (resolution)
    TouchscreenYes
    LCD Features-
    -
    -
    Memory8GB (internal); micro SD card slot supports up to 32GB (external)
    Hard Drive-
    HDD Interface-
    ColorTitanium Silver
    Multimedia3.0 Megapixel (rear)
    Music: MP3, AAC/AAC+/EAAC+, WMA, OGG (vorbis), FLAC, AC-3 ; Sound: AVideo Codec: Mpeg4, H.264, H.263, VC-1, Divx, VP8, WMV7/8, Sorenson Spark; 
    Format: 3gp(mp4), wmv(asf), avi(divx), mkv, flv, webm
    Format: 3gp(mp4), wmv(asf), avi(divx), mkv, flv, webm
    CommunicationWi-Fi Only
    Bluetooth
    Ports802.11n wireless network support
    Proprietary USB and power connection
    -
    -
    -
    -
    Input-
    Power4,000mAh (Battery)
    -
    Dimension4.8" x 7.6" x .41" (W x H x D)
    Weight0.76 lbs
    Software
    *Software can be changed without notice
    -
    -
    -
    -
    -
    -
    -
    -
    -
    -
    Others-
    -
    -
    -
    -
    Warranty1 year limited warranty period for parts
    1 year limited warranty for labor
    Samsung Support Pagehttp://www.samsung.com/us/support/owners/product/GT-P3113TSYXAR
    (includes manual downloads and FAQs & How Tos)


    Back to CyberLiving home page

    Other Posts
    Back to home page

    Sunday, July 28, 2013

    Samsung XE700T1C Review/Specs


    Samsung XE700T1C overview
    Samsung XE700T1C overview | source: http://www.samsung.com
    Samsung ATIV SmartPC Pro XE700T1C-A01US


    The XE700T1C is one of Samsung's latest in tablet PCs. Although they were not the first to have thought it, it has revolutionized user's computing experience by combining the power of a notebook (or in the case a desktop) and the convinience of a tablet.

    It is comparable to a notebook because it comes with a full-sized keyboard out of the box which you can mount if needed. It is like a desktop PC because it uses an Intel® Core™ i5 Processor 3317U (1.70GHz, 3MB L3 Cache) to drive it. Now that is what I call a tablet with a punch.

    Here are some positive notes about this Tablet

    • Intel® Core™ i5 processor - This tablet is fast and it owes it to its processor.

    • Tablet convertible to Notebook - for more productivity, this tablet comes with a keyboard that you can dock to it for faster typing.


    Samsung XE700T1C front
    Front of the tablet. It uses Windows 8 for its OS | source: http://www.samsung.com
    When docked onto its keyboard:

    Samsung XE700T1C docked on keyboard
    Docked onto its keyboard, it becomes a notebook for productivity | source: http://www.samsung.com


    • Sketching/Drawing/Creating an art is much easier and faster - With the S-pen and its 1024 level pressure sensitivity, graphic designers will surely love its accuracy.

    • It has multi-touch capability - With its 10-points multi-touch capability, it provides more control by allowing you to use all ten fingers at the same time as opposed to the traditional 2-points multi-touch that we have been accustomed to.


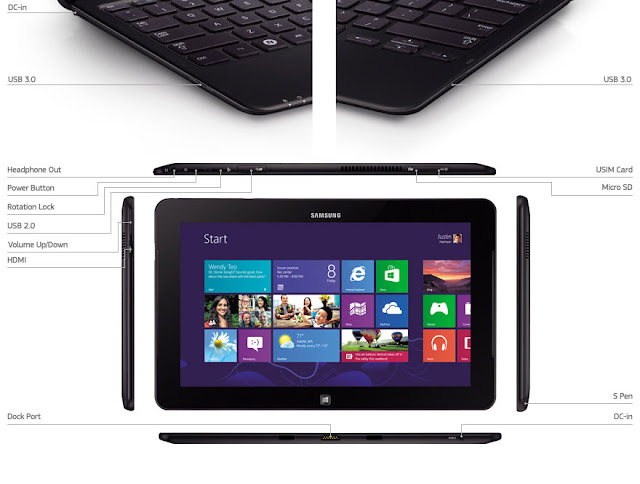
    Here is an overview of its ports:
    Samsung XE700T1C ports overview
    Ports overview of the device | source: http://www.samsung.com
    User experience:
    Here are some comments from people who have already used the device.

    • Pros

      1. Indeed this tablet is very fast.
      2. The keyboard, although a bit cramped, is good for typing and is very easy to get accustomed to.
      3. Very slick and stylish design.
      4. It has a solid feel, given that it has a plastic casing.
      5. Very good for doing artwork.
      6. Bright display
    • Cons
      1. Docking into the keyboard is not very easy.
      2. Keyboard gets disconnected easily due to improper docking.
      3. No battery on the keyboard. It gets power from the tablet instead of it providing for the tablet. Many users asked this improvement.
      4. The S pen is a hit or miss to people as opposed to what Samsung's sales pitch to be very good. Others like it while others say it is too small on their hands. One artist mentioned it to be too smooth that there is not much felt while drawing/writing thus it is very easy to go over.
      5. Battery capacity to device power consumption limits a user to at most 5 hours based on their actual experience.
      6. Touchpad on keyboard is not so accurate.


    Here is the complete list of its specifications:

    Operating SystemGenuine Windows 8 (64-bit)
    Processor / ChipsetIntel® Core™ i5 Processor 3317U (1.70GHz speed, 3MB L3 Cache)
    Intel HM76
    GraphicIntel® HD Graphics 4000
    Display11.6" FHD LED Display (1,920 x 1,080 resolution)
    TouchscreenYes
    LCD FeaturesGloss, 16:9, 400 nits SuperBright Plus Technology
    Touch Screen with Digitizer S Pen
    LED Full HD Screen
    Memory4GB DDR3 System Memory at 1600MHz (on BD 4GB)
    Hard Drive128GB Solid state Drive
    HDD InterfaceSATA2
    ColorBlack
    MultimediaStereo Speakers ( 1 watts x 2 )
    SoundAlive™
    Internal Dual Array Digital Mic
    2.0 megapixel Webcam (front), 5.0 megapixel Webcam with Flash (rear)
    CommunicationIntel® Centrino® Advanced-N 6235, 2 x 2 802.11abg/n (up to 300Mbps), Widi Support
    Bluetooth V4.0
    Ports1 Micro HDMI
    1 USB3.0
    MicroSD Multi-media Card Reader
    1 Headphone out/Mic-in Combo
    1 Dock Port™
    1 DC-in
    InputTouch screen
    Power4Cell (49Wh)
    40 watts AC Adapter
    Dimension304.0 x 189.4 x 11.9mm (11.97" x 7.46" x 0.47")
    Weight0.888kg (1.96lbs) [Wifi Model]
    Software
    *Software can be changed without notice
    S Note
    S Player
    S Gallery
    S Camera
    PowerDVD
    Settings
    SW Update
    Recovery
    Norton Internet Security (60 days Trial)
    Norton Online Backup (30 days Trial)
    OthersAmbient Light Sensor
    Accelarometer Sensor
    Compass Sensor
    Gyro Sensor
    Prominity
    Warranty1 year limited warranty period for parts
    1 year limited warranty for labor
    Samsung Support Pagehttp://www.samsung.com/us/support/owners/product/XE700T1C-A01US
    (includes manual downloads and FAQs & How Tos)


    Back to CyberLiving home page

    Other Posts
    Back to home page

    Saturday, July 27, 2013

    Speed up internet browsing by skipping server side DNS lookup and blocking unwanted ads

    Use Hosts file to speed up browsing

    The title says it all. Page load speed can be increased if only host name resolution can be done within your computer and you don't have to wait for all the ads in a site to load.

    In a previous post, I mentioned that you can increase browsing speed (page load speed) by using other DNS servers like Google Public DNS and OpenDNS instead of using your ISP's DNS service. This is because your ISP may be over saturated that it is having difficulty coping up with all the requests.

    But using Google Public DNS or OpenDNS  is still in the internet and so you still need to go through it to resolve a host name.

    But there is a way to resolve host names within your local machine. In the old days, host name resolution is done by using the Hosts file (this file has no extension). This file resides in:

    C:\Windows\system32\drivers\etc\

    The Hosts file is a simple text file that contains IP address with its corresponding host name. It maps a host name to its corresponding IP address. We can read and edit its content by using a text editor like Notepad.

    How to add a host name and its corresponding IP address in the Hosts file?
    If you open your Hosts file now in Notepad, you will only see one entry for localhost, 127.0.0.1     localhost also called the loopback address.

    The format for adding to the list is the IP address first, then a space and finally the host name. It does not matter if you have one, two or as many spaces between IP address and host name as the succeeding spaces will be ignored but for readability everyone use the tab.

    If for example then we wanted to add www.google.com using the IP address 74.125.128.191 (one of many Google's IP address). It would look like this: 74.125.128.191     www.google.com and if I decided to add one for this blog: 74.125.128.132     cyberliving.blogspot.com. The content would then look like this:

    # This file contains the mappings of IP addresses to host names. Each
    # entry should be kept on an individual line. The IP address should
    # be placed in the first column followed by the corresponding host name.
    # The IP address and the host name should be separated by at least one
    # space.
    #
    # Additionally, comments (such as these) may be inserted on individual
    # lines or following the machine name denoted by a '#' symbol.
    #
    # For example:
    #
    #      102.54.94.97     rhino.acme.com          # source server
    #       38.25.63.10     x.acme.com              # x client host

    127.0.0.1       localhost
    74.125.128.99 www.google.com
    74.125.128.191 www.blogger.com

    Save this file. Please note that notepad automatically adds extension to saved files so do not use Save as... just use Save to preserve the property of the file.

    Once the file is saved, the effect of it is immediate. There is no need to restart or disconnect/connect to the internet. While using Chrome version 28, it is not necessary to restart the browser as well but some browsers may require restarting.

    Guides to Host file editing
    Here are some rules that must be strictly followed in order that you will not wreck havoc with your networking.
    It is recommended that you back-up your Hosts file before you edit it. Just create a back-up folder within the C:\Windows\system32\drivers\etc\ folder then copy the Hosts file and paste it inside the created back-up folder.


    1. Each entry should be kept on individual line. One IP address and host name per line. If a host name has more than one IP address, then add it in another line with again its host name.
    2. IP address is placed in front of the host name separated by at least one space.
    3. Do not associate host name with any programs. Watch out when opening the Hosts file as you might accidentally associate this with a program like Notepad. Never click the "Always use the selected program to open this kind of file" radio button to avoid this.
    4. When saving, just click on Save and not Save as... to avoid placing an extension to the file. Notepad and other programs automatically ads the default extension when Saved as... is used.

    To block a site or ad from loading
    In order to do this, give the host name where the ads are coming from or the site you wish to block with the localhost IP address (127.0.0.1)

    Benefits of using the Hosts file
    By using your machine to look-up sites, it will be much faster for it to resolve their host names and consequently land to the page faster.

    Blocking ad sites from loading will also make the page you are trying to visit load up faster. The downside though is that you will see some content of the site not loading or with an error message.

    Blocking some malicious sites containing malware or trojans (or phishing sites) will protect you from accidentally landing on them thus preventing you from downloading said malware and/or trojans. You will also be prevented from entering phishing sites thus your username and password is protected.

    Back to CyberLiving home page

    Other Posts

    Thursday, July 25, 2013

    Use custom CSS fonts to enrich your page

    How to add stylish and curvy fonts to your blog post/page using CSS?

    You may have observed while visiting other sites that they have very nice looking fonts specially with their qoutes. But however you hard you try to find what font they used, you can not duplicate it. How was that possible? It is by using custom CSS fonts.

    Today many are already offering such fonts like fonts.com and face-fonts. But most of these needed that you upload them to your server and access it from there. There is one alternative though that does not require uploading to your server. It is Google Web Fonts or simply Google Fonts.

    To give a sample of the fonts, here is a famous line from Confucius:

    Chose a job you love, and you will never have to work a day in your life.
    -Confucius
    The custom font used above is cursive Bilbo from Google Web Fonts. The texts affected by the custom font are the quote

    Here is how it is done:
    Using custom fonts with CSS. Here is the code for the above quote:

    <blockquote style="font-family: 'Bilbo', cursive http://fonts.googleapis.com/css?family=Bilbo stylesheet text/css; font-size: 18px; font-style: italic; line-height: 1.45; margin: 0.25em 0; padding: 0.25em 40px; position: relative; width: 500px;">
    <span style="color: lightgrey; font-size: 130px; left: -30px; position: absolute; top: -50px;">“</span><span style="font-family: Georgia, serif;">Chose a job you love, and you will never have to work a day in your life.</span><br />
    <span style="color: lightgrey; font-family: 'Bilbo', cursive http://fonts.googleapis.com/css?family=Bilbo stylesheet text/css; font-size: 15px;">-Confucius</span></blockquote>

    Google Fonts' instructions in using their fonts is to include a code into your website. For blogger users, you will have to include it into your template. By doing so, the said font will be available anytime you want to use it. The downside to it is that, the more fonts you add into your template, the slower it is for your site to load. And since you are forced not to add as much custom fonts as you want, you don't have that much flexibility in using all these custom fonts.

    Fortunately there is another way of coding it that will only require to add a code into your browser. What I will describe below  does not require you to add anything in your template. But this will still add into the loading time for the page/blog post you will apply it with but not on your whole site.


    • Follow the basic format for the code as shown below. Just include the code as inline CSS to the element you wish to place it. In the case that there is already an existing inline CSS in the said element, just copy the texts inside the double quotes and insert it inside the CSS.
    style="font-family: 'Bilbo', cursive http://fonts.googleapis.com/css?family=Bilbo stylesheet text/css;"
    Note the different colors of the texts. The red ones represent the URL for the font and the blue ones represent the name of the font.
    • Get the font URL for the custom font.
      1. Go to http://www.google.com/fonts/ and browse through the list then choose the font that you wish.
      2. When you have chosen, click on the quick use button at the lower right for each font.
      3. You will be redirected to another set of selections. If the font you selected had more than one style, you will need to choose for the style that you want. Choose only one. Actually it is possible to choose all but that is if you will be placing your code on your template.
      4. You will also need to choose a character set in case there are more than one. Again just choose one for the same reason as above.
      5. Finally, you will see some code similar to this:
    <link href='http://fonts.googleapis.com/css?family=Roboto+Slab&subset=cyrillic-ext' rel='stylesheet' type='text/css'>
    Copy all the text inside the single quote after href= and then in the basic format mentioned above replace the red texts with this. In the example above, replace http://fonts.googleapis.com/css?family=Bilbo with http://fonts.googleapis.com/css?family=Roboto+Slab&subset=cyrillic-ext.


    • Get the font name for your chosen font
      1. Just below the link code is another code that looks like this:
    font-family: 'Roboto Slab', serif;rel='stylesheet' type='text/css'>
    Copy the font-family until the first semi-colon (semicolon not included) and go back to your inline CSS to replace the existing font-family similar to the way you did with the URL. In the example above, replace font-family: 'Bilbo', cursive with font-family: 'Roboto Slab', serif.

    That is it, you now have custom fonts inside your content and you can use different font type for different page and still not affecting the loading time of your site.

    It is up to you know how big yo want it. What color and the positioning of the texts to make it even look better.


    Tuesday, July 23, 2013

    Smart Bro DNS vs. Google Public DNS

    Here is a study comparing the DNS server from Smart Bro performance against that of Google Public DNS.

    It has been thought that because Google has a large database that using their public DNS server would increase internet speed. So how true is it?

    To begin, let me illustrate what happens when we browse the internet. At least as I understood it.

    It starts from our computer. When we open our browser and type in a URL in the address bar called host name (like www.google.com), our computer sends out this information to the internet. But every machine, including the servers that host a domain, do not have word names, it has numeric names called IP address (like 173.194.38.144). The words are only for humans because we are better at remembering words than numbers.

    To resolve this, another server is needed to translate the host name into an IP address before your request for a web page can continue. That is the job of a DNS server, to resolve host names into its equivalent IP address then directs you to the proper server.

    Your computer sends out request to a host name, host name gets translated into an IP address by a DNS server, target IP address sends out requested data to your computer.
    Smart Bro vs. Google Public DNS
    To compare the two let us take the latency by using the ping command to check for delay but according to Google the delay in internet browsing also includes the host name resolution time.

    "In addition to the ping time, you also need to consider the average time to resolve a name. For example, if your ISP has a ping time of 20 ms, but a mean name resolution time of 500 ms, the overall average response time is 520 ms. If Google Public DNS has a ping time of 300 ms, but resolves many names in 1 ms, the overall average response time is 301 ms.

    The formula then for delay is:
    Delay = connection latency + host name resolution time

    To get the host name resolution time, I used the nslookup command in a batch file in DOS. I have taken some data at different times of the day as internet traffic varies during the day. Here is a summary of the result.

    Time Host Name Ping Result DNS Server Resolution Time Total Delay
    Smart Bro Google Public DNS Smart Bro Google Public DNS Smart Bro Google Public DNS
    Day1 @ 1am www.google.com 312 ms 479 ms 1110 ms 1130 ms 1422 ms 1609 ms
    www.facebook.com 447 ms 290 ms 1140 ms 1050 ms 1587 ms 1340 ms
    cyberliving.blogspot.com 518 ms 446 ms 1160 ms 2170 ms 1678 ms 2616 ms
    Day1 @ 9am www.google.com 331 ms 512 ms 1290 ms 1120 ms 1621 ms 1632 ms
    www.facebook.com 433 ms 474 ms 1080 ms 1140 ms 1513 ms 1614 ms
    cyberliving.blogspot.com 486 ms 507 ms 1380 ms 1130 ms 1866 ms 1637 ms
    Day1 @ 4pm www.google.com 411 ms 318 ms 1020 ms 700 ms 1431 ms 1018 ms
    www.facebook.com 358 ms 283 ms 880 ms 640 ms 1238 ms 923 ms
    cyberliving.blogspot.com 420 ms 303 ms 1090 ms 700 ms 1510 ms 1003 ms
    Day1 @ 9pm www.google.com 509 ms 438 ms 1140 ms 900 ms 1649 ms 1338 ms
    www.facebook.com 399 ms 330 ms 1020 ms 870 ms 1419 ms 1200 ms
    cyberliving.blogspot.com 510 ms 447 ms 6390 ms 940 ms 6900 ms 1387 ms
    Day2 @ 12am www.google.com 344 ms 298 ms 700 ms 550 ms 1044 ms 848 ms
    www.facebook.com 288 ms 255 ms 710 ms 430 ms 998 ms 685 ms
    cyberliving.blogspot.com 302 ms 325 ms 670 ms 640 ms 972 ms 965 ms
    Day2 @ 10am www.google.com 645 ms 349 ms 1670 ms 750 ms 2315 ms 1099 ms
    www.facebook.com 505 ms 288 ms 1450 ms 720 ms 1955 ms 1008 ms
    cyberliving.blogspot.com 566 ms 300 ms 1650 ms 720 ms 2216 ms 1020 ms
    Day2 @ 7pm www.google.com 378 ms 330 ms 840 ms 570 ms 1218 ms 900 ms
    www.facebook.com 428 ms 303 ms 740 ms 560 ms 1139 ms 863 ms
    cyberliving.blogspot.com 305 ms 349 ms 810 ms 820 ms 1115 ms 1169 ms

    Comparing the two, in general, using Google Public DNS gives a latency and host name resolution that is lower, thus the overall delay is much lower compared to that of my ISP.

    It is interesting to note though that my first two results in Day 1 is showing a better performance for my ISP. And this is during a non-peak hours my time. But otherwise, Google Public DNS is thus far winning the battle. That is, of course, only one part of the problem solved. We have only looked at the delay from the moment our computer made the request until we got a response.

    What does it mean to you? When you go to a certain web page, your computer actually makes several http requests. This is because web pages have javascript, CSS, html, images, Flash, etc. which are separate files in themselves saved at the same domain or from other domains and each one requires a separate request (http request) to the same domain.

    Here is an example:
    If I would have visited www.facebook.com on Day1 @ 9pm and it requires a total of 5 http requests, using my ISP's DNS would have a delay of 7.095s (5*1419ms) while with Google Public DNS it would only be 6s (5*1200ms) or a difference of approximately 1 second. With higher http request for a page the longer you will have to wait and the bigger difference between the two.

    Throughput Speeds
    How about the download and upload speed (Throughput) of our internet connection? Does using other DNS server improve it? For this, I have to use the online testing tool at speedtest.net. I choose three locations to test my download and upload speed. One nearest my location, one midway between my location and the Americas and one in the United States.

    Time Down/Up Speed Tarlac Lutsk Sioux Falls SD
    Smart Bro Google Public DNS Smart Bro Google Public DNS Smart Bro Google Public DNS
    Day1 @ 10am Download Speed 0.35Mbps 0.25Mbps 0.40Mbps 0.30Mbps 0.53Mbps 0.43Mbps
    Upload Speed 0.15Mbps 0.15Mbps 0.21Mbps 0.17Mbps 0.23Mbps 0.17Mbps
    Day1 @ 4pm Download Speed 0.46Mbps 0.55Mbps 0.77Mbps 0.71Mbps 0.32Mbps 0.71Mbps
    Upload Speed 0.16Mbps 0.18Mbps 0.23Mbps 0.20Mbps 0.17Mbps 0.29Mbps
    Day2 @ 12am Download Speed 0.94Mbps 0.34Mbps 1.03Mbps 0.30Mbps 1.11Mbps 0.48Mbps
    Upload Speed 0.15Mbps 0.13Mbps 0.25Mbps 0.18Mbps 0.29Mbps 0.29Mbps
    Day2 @ 10am Download Speed 0.20Mbps 0.43Mbps 0.53Mbps 0.46Mbps 0.36Mbps 0.48Mbps
    Upload Speed 0.14Mbps 0.15Mbps 0.20Mbps 0.21Mbps 0.26Mbps 0.27Mbps

    The result above is now reversed. This time, it looked like Google has lower download and upload speeds compared to Smart Bro.

    If I am to translate this into browsing speed, it will be like this. It is thought of that currently, the average size of a page is 1.3MB. Let us say I wanted to visit a site (www.exampleLutsk.com) located in the area of Lutsk, Ukrain during the time Day1 @ 10am, it would take me to download the content of the page (1.3MB) in 26 seconds (0.4Mbps=0.05MBps) using my ISP's DNS while with Google it would be 30.5 (0.3MBps=0.0375MBps) seconds or a difference of 4 seconds between the two.

    Summary
    With the tabulated results above, I could say that there is no difference with using my Smart Bro's DNS against that of Google Public DNS in terms of internet browsing speed. That is because, whatever advantage Google had with latency and host name resolution was erased by the download and upload speed. One reason I see that caused the bandwidth reduction in using Google's Public DNS is that it could be redirecting me to a server further from my location. But this is something that I have not verified and is beyond the scope of this post.

    Increased HTTP look-up or not, notice at the tabulated ping results that my round trip time (RTT) is quite large. If some believe that an RTT below 100ms is what is deemed good/acceptable couple that with an average of 0.58Mbps (only results using Smart Bro DNS was used in the calculation) when it is rated at 3Mbps then what I have is mediocre at best.

    Back to CyberLiving home page

    Other Posts

    Sunday, July 21, 2013

    How to check your DNS server speed

    Manually check your DNS performance or speed or compare your ISP DNS speed to other DNS server

    I have looked around on ways on how to compare my ISP's DNS speed with that of Google Public DNS but the results I get are sketchy at best.

    To check for a DNS speed one has to look not only on the ping test but the rate at which a DNS server resolves host names. Here is an excerpt from Google:

    "In addition to the ping time, you also need to consider the average time to resolve a name. For example, if your ISP has a ping time of 20 ms, but a mean name resolution time of 500 ms, the overall average response time is 520 ms. If Google Public DNS has a ping time of 300 ms, but resolves many names in 1 ms, the overall average response time is 301 ms."

    The formula therefore that I will be using here is:

    DNS Speed = connection latency + host name resolution time

    For connection latency this will be the result from Pinging. As for the host name resolution time, I could not find one anywhere. Well, at least not something that you still need to download.

    I did found out that one way to check for a DNS response is by using the nslookup which has the command line nslookup www.example .com typed in the command prompt. The time it takes to give back result will be the host name resolution time.

    The trick will be on how to get this elapsed time. You can try stop watch and time it starting the moment you press enter and stopping once result is displayed. This however is prone to error and result will be very inaccurate considering that the elapsed time is a fraction of a second.

    The solution is to time stamp it by using the prompt $t. This command will change the C:\> prompt into time like this  1:30:50.62. Now you can just subtract the before and after time that the nslookup command was executed. Note though that this again will include the time you typed the command.

    To remove the typing time for the command, use a batch file and this is what you have to run from DOS shell.

    To create a batch file

    • Open a text editor like Notepad.
    • Write your code into Notepad. In my case I only wrote three lines:
      • prompt $t
      • nslookup www.example.com
      • prompt
    • The first line is to change the C prompt into time format, then the command nslookup and lastly, the third line is to change back the command prompt to C:/>
    • The result will be as follows


    • Save it as batch file by adding the .bat afer your file name and under Save as type, select All files
    • To launch this in DOS, just type the name of the file from the same directory you saved the batch file.
    • For this result, the host name resolution time is 9.25 seconds or 9250 millisecond (1:46:08.84 - 1:45:59.59)

    Back to CyberLiving home page

    Other Posts

    Friday, July 19, 2013

    Smart Bro internet speed is very slow. How to make it faster?

    Improve your internet connection speed with Google Public DNS or OpenDNS

    If you feel that your Smart Bro internet connection is very slow and you would like to improve it, here is how.

    Change the DNS settings from Smart Bro, or whichever your ISP is, into Google's Public DNS or OpenDNS.

    For Google: Primary/Main DNS: 8.8.8.8 and Secondary/Alternate DNS: 8.8.4.4 the two can be interchanged.

    For OpenDNS: Primary/Main DNS:208.67.222.222 and Secondary/Alternate DNS: 208.67.220.220

    To configure your DNS refer to the post How to change your Smart Bro DNS server to Google Public DNS or OpenDNS

    A layman's explanation as to why changing the DNS address can improve browsing speed
    Every domain on the internet has a name or an IP address much like your computer has an IP address. This IP address are in numbers with dots much like 173.194.126.52 (one of Google's many IP addresses). But humans do not remember numbers very well but are good at remembering words which is also why you have contacts in your cellphone to store phone numbers because it is easier to remember names.

    Back on topic, in order to remedy this problem, proponents of the world wide web decided on a host name to represent an IP address. So for IP address 173.194.126.52 its host name is Google.com.

    A DNS (Domain Name Server) has the function of translating a host name into a machine readable IP address. Thing is, there are millions (if not billions) of host names currently registered today. Add to it, there could be more than one IP address linked to a host name. It is therefore impossible for a single DNS server to store all this data and so they ask the help of other DNS servers for host names not currently on their list adding to the time to resolve a host name which in turn causes a user (that is you and me) to have to wait longer before our browser could completely display the page we requested.

    But, DNS servers differ on their capacity to store host names. Like in the case of our Smart Bro and Google or OpenDNS. Smart Bro's DNS server has a limited data compared to Google/OpenDNS's much much larger database.

    So in the case of Google or OpenDNS the time to resolve a host name is much faster as they don't have to look somewhere else to resolve a host name unlike Smart Bro.

    Back to CyberLiving home page

    Other Posts

    How to change your Smart Bro DNS server to Google Public DNS or OpenDNS

    Wednesday, July 17, 2013

    How to change your Smart Bro DNS server to Google Public DNS or OpenDNS

    Smart Telecom's MF180 USB modem is bundled with an interface which has a limited options on it Settings page. Not even a away to edit its network configuration settings through the User Interface (UI).

    So how to change the DNS setting?
    By editing the NetConfig file.

    In windows explorer, go to C:/Program Files/SMART BRO. In the SMART BRO folder look for the NetConfig file. This is what you must edit.

    note: Before you do anything with the file, you must create a back-up just in case you mess up while editing, you have a back-up file to copy from. Just create a folder and name it Back-up, copy NetConfig file and paste it in the Back-up folder.

    Right click NetConfig then Open With ... choose Notepad. In Notepad, you will see the following:


    Original SMART BRO Configuration
    Change it to
    [SmartBro]
    Name=SmartBro
    UserName=none
    UserPass=none
    DialNum=*99#
    IsAutoGetAPN=0
    APN=SMARTBRO
    IsAutoGetDNS=1
    MainDNSaddr=0.0.0.0
    AltDNSAddr=0.0.0.0
    IsAutoGetPDP=1
    pdpAddr=0.0.0.0
    pdpType=IP
    AuthType=PAP
    IsDfault=1
    DeniEditDelete=1
    askUserAndPass=0
    SaveuserAndPass=0
    IsFactoryDefault=1
    IsMmsConfig=0
    [SmartBro]
    Name=SmartBro
    UserName=none
    UserPass=none
    DialNum=*99#
    IsAutoGetAPN=0
    APN=SMARTBRO
    IsAutoGetDNS=0
    MainDNSaddr=8.8.8.8
    AltDNSAddr=8.8.4.4
    IsAutoGetPDP=0
    pdpAddr=0.0.0.0
    pdpType=IP
    AuthType=PAP
    IsDfault=1
    DeniEditDelete=1
    askUserAndPass=0
    SaveuserAndPass=0
    IsFactoryDefault=1
    IsMmsConfig=0

    In the original configuration, IsAutoGerDNS is 1 while I changed it to zero (0) to mean false. This change cause the UI not to automatically get the DNS instead configure it to use the set MainDNSaddr and AltDNSAddr which is 8.8.8.8 and 8.8.4.4 respectively (Google's public DNS- can be interchanged). Without setting IsAutoGetDNS to 0, the UI will automatically get the ISP assigned DNS for you even if you set the MainDNSAddr and AltDNSAddr to your desired DNS.

    Save the file and relaunch your Smart Bro UI to connect to the internet.

    For OpenDNS, use the following: MainDNSAddr=208.67.222.222; AltDNSAddr=208.67.220.220

    Other public DNS are:
    Comodo Secure DNS: Main=8.26.56.26; Alt=8.20.247.20
    Norton ConnectSafe: Main=198.153.192.40, Alt=198.153.194.40
    DNSResolvers.com: Main=205.210.42.205, Alt=64.68.200.200

    Back to CyberLiving home page

    Other Posts
    Smart Bro internet speed is very slow. How to make it faster?
    Meta tag generator

    Tuesday, July 16, 2013

    Meta tag generator

    Here is a free meta tag generator/builder for blogger users and non-blogger users that include facebook and twitter meta tags.

    Simply input the page title, description and keywords (if you wish not to include it leave it blank) and the post URL and click the Generate Meta tags button. To include facebook and twitter meta tags, just click on the option list that you wish included.

    Copy the code (that appears after the button) applicable for you and paste it on your page. It is important to copy including all leading spaces so it will align properly when you paste it on blogger template, If you are a blogger user look for the <b:include data:='blog' name='all-head-content'/> and paste the code just below it. For non-blogger users, paste the code within the <HEAD> and </HEAD> tags.


    You have 160 characters left.


    You have 160 characters left.


    You have 160 characters left.


    Tell Robots to:
    Index this page and follow the links on the page
    Index this page but do not follow the links on the page
    Do not index this page and follow the links on the page
    Do not index this page and do not follow the links on the page

    Facebook Meta tags
    Include Facebook Meta title tag (og:title)
    Include Facebook Meta URL tag/Canonical URL (It will use the same URL as the one supplied above) (og:URL)
    Include Facebook Meta description tag (og:description)
    Include the type

    Select Type


    Include Facebook Meta image tag (og:image)


    Include Facebook User IDs (fb:admins)


    Twitter Meta tags
    Include Twitter Meta URL tag (twitter:url)
    Include Twitter Meta Title tag (twitter:title)
    Include Twitter Meta Description tag (twitter:description)
    Include Twitter Meta image tag (twitter:image)
    Include the type

    Select Twitter Card Type


    For Blogger Users copy this
    For others use this


    Back to CyberLiving home page

    Other Posts
    How to change your Smart Bro DNS server to Google Public DNS or OpenDNS
    Add your profile photo in search results